
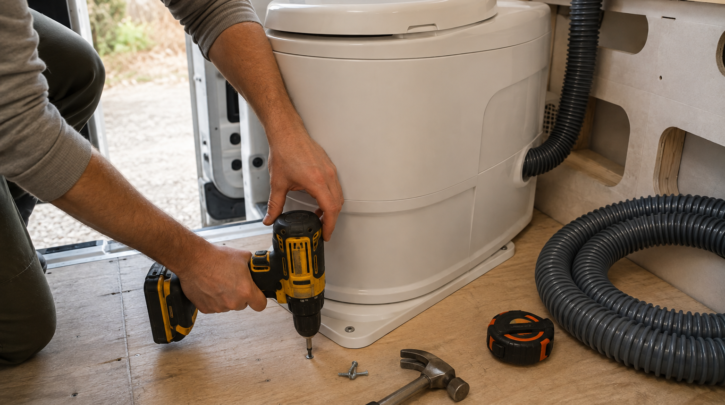

Every model differs in the details, but the overall installation sequence is consistent across brands. Here’s the general process, with notes on where specific models diverge and what tends to trip up first-time installers.
Step 1: Plan Placement Before You Buy Anything Else
Confirm floor space — including hand-access room on at least one side for emptying — headroom above the unit for lifting out bins, and door swing clearance. Cross-check against your chosen model’s exact footprint; see our van life buying guide for current dimensions across the main options. This step matters more than it seems: a toilet that fits on paper but leaves no room to actually reach in and empty the solids bin comfortably becomes a genuine daily annoyance, not just a minor inconvenience.
Step 2: Cut and Reinforce the Vent Hole
Most models use a 1″–2″ diameter vent hose depending on brand — Nature’s Head uses 1-1/4″ PVC pipe fittings, OGO uses 40mm HT pipe, and Air Head’s hose is roughly 48mm. Cut the exterior hole to match your model’s specified vent kit, and reinforce the surrounding panel if you’re cutting through a thin composite wall — a simple backing plate prevents the fitting from working loose over time on rough roads, which is a more common failure than most first-time builders expect.
Step 3: Mount the Base
Most units bolt down through four pre-drilled mounting points into a plywood subfloor or a dedicated base platform. If your van floor is bare metal, build a small plywood mounting platform first rather than drilling directly into the van’s structure — this also gives you a bit of flexibility to shim the unit level if your van’s floor has any slope or unevenness.
Step 4: Wire the Fan
Nearly every self-contained model runs its fan on 12V DC, typically drawing well under 2 amps continuous. Wire to a fused circuit on your van’s 12V system, not a shared circuit with something that could overload it and take your ventilation down along with an unrelated appliance. If you’re running an electric-agitator model like the OGO Origin, budget for its additional draw separately from the fan circuit, since the two components typically don’t run simultaneously but both need reliable power available on demand.
Step 5: Connect and Route the Vent Hose
Keep the run as short and straight as reasonably possible — every 90-degree elbow reduces airflow efficiency, which is why manufacturers publish specific maximum run lengths paired with maximum elbow counts rather than a single length figure alone. Route it so the termination point sits away from windows, doors, and roof vents/fans to avoid odor re-entering the cabin. See our dedicated venting and ventilation guide for hose-length limits by brand and general routing best practices.
Step 6: Install the Exterior Vent Cap
Use the manufacturer’s vent kit where available — most include an insect screen and a low-profile exterior cover designed specifically for that brand’s hose diameter. A generic vent cap can technically fit in some cases but tends to be a looser, leakier match than the purpose-built option. Seal thoroughly around the exterior penetration with a sealant rated for your specific wall material to prevent water intrusion, which is one of the more common sources of van build water damage when skipped or done hastily.
Step 7: Test Before Final Trim-Out
Power on the fan and confirm airflow at the exterior vent — a tissue held near the outlet should visibly move — before you install any surrounding cabinetry or trim that would make the connections harder to access if something needs adjusting. This is an easy step to skip when you’re excited to see the build coming together, but it’s far easier to fix a loose fitting now than after you’ve built a bench seat around it.
Common Installation Mistakes
- Skipping the backing plate on thin composite walls, leading to a loose vent fitting within months of regular driving
- Running the vent hose with too many tight bends, which reduces airflow enough to cause odor issues later even though the fan itself is working fine
- Wiring the fan to a circuit shared with something that draws heavily and trips together, taking down ventilation at an inconvenient moment
- Not leaving vertical clearance to remove the solids bin once cabinetry is finished around the unit — a mistake that’s expensive to fix after the fact since it usually means partially disassembling built-in furniture
Tools You’ll Actually Need
Most installs need only a drill, a hole saw sized to your model’s vent hose diameter, basic hand tools for the mounting hardware, a sealant appropriate for your van’s wall material, and a multimeter if you want to verify your 12V wiring before final connection. No specialized plumbing tools are required since there’s no water line involved anywhere in the process — a genuine advantage over a traditional water-flush toilet install, which typically needs actual plumbing skills and parts.
Sealing and Weatherproofing in Detail
The exterior vent penetration is one of the few places in a van build where a small sealing mistake can cause water damage well out of proportion to how minor the oversight seemed at the time. Use a sealant explicitly rated for the material you’re penetrating — silicone works well on many surfaces but doesn’t adhere reliably to every composite panel, so check compatibility rather than assuming any silicone sealant will do. Apply it in a continuous bead around the full perimeter of the vent cap’s base, not just at a few points, and inspect it after the first few weeks of driving, since vibration and thermal expansion can reveal a thin spot that wasn’t obvious when the sealant first cured. Re-checking this seal during your regular maintenance routine, not just once at install, catches small failures well before they become water intrusion problems.
Working Around Existing Plumbing and Wiring
If you’re retrofitting a composting toilet into a van that already has other systems built out — water lines, existing wiring runs, insulation — take the time to trace what’s actually behind the wall or floor section you’re planning to cut before drilling. This sounds obvious, but it’s a common source of expensive mistakes specifically because composting toilet vent holes are often planned late in a build, after other systems are already in place and less visible than they were during initial construction. A stud finder combined with a small inspection hole cut first, before committing to the full vent hole size, is a cheap insurance step against hitting something you didn’t expect.
Post-Install Checklist
Before you consider the install finished, run through a short verification pass rather than assuming everything’s fine just because the unit powers on. Confirm the fan pulls air visibly at the exterior vent, check every mounting point for play or looseness after the unit has been sat on a few times, verify the urine container seats and releases cleanly without excessive force, and add your first batch of carbon additive before the first real use rather than after. It’s also worth taking a few reference photos of the finished vent routing and wiring connections before any surrounding trim goes on — a small time investment that pays off considerably if you ever need to troubleshoot or service the install months down the line without wanting to guess at what’s behind the panel.
Related Guides
- Composting toilet venting/ventilation for vans
- Best composting toilets for van life
- Small/compact composting toilets for tight spaces
Frequently Asked Questions
Do I need any special tools for installation?
Most installs need only a drill, a hole saw sized to your model’s vent hose, basic hand tools, and a sealant appropriate for your van’s wall material. No specialized plumbing tools are required since there’s no water line involved.
Can I install a composting toilet without cutting an exterior vent hole?
Not recommended — passive charcoal-filter-only setups exist for some models, but active exterior venting significantly outperforms them for long-term odor control and is what every manufacturer designs their unit around by default.
How long does a typical install take?
Most van builders report a half-day to a full day for a first-time install, largely driven by how much reinforcement the vent hole and mounting base need, and how accessible the chosen mounting location already is within the build.
Can I move the toilet to a different spot later if the first location doesn’t work well?
Yes, though it means repeating the vent hole and mounting steps at the new location and properly sealing the old vent penetration. It’s a bigger job than the initial install, which is exactly why getting placement right the first time — including realistic hand-access clearance — is worth the extra planning time upfront.
Should I install the toilet before or after finishing the surrounding walls and flooring?
Most experienced builders recommend a rough test-fit and vent routing plan before final wall and floor finishing, then the actual permanent mounting and full connection afterward. This sequence lets you confirm placement and access clearance while changes are still cheap, without leaving the unit sitting unmounted for so long that it becomes a tripping hazard or gets damaged during other build work.