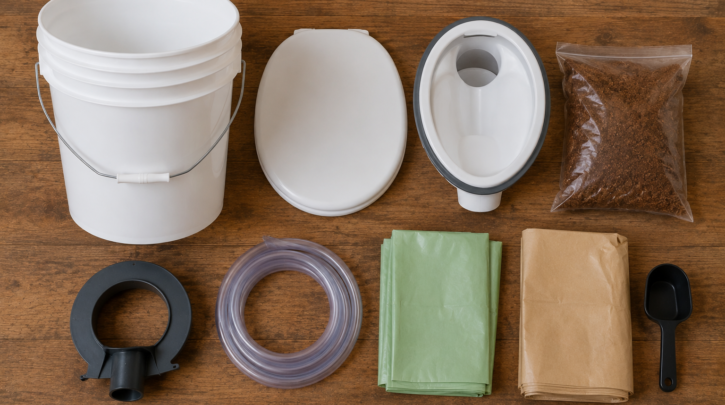

Whether you’re building a DIY unit or setting up around a manufactured one, this is the complete list of what you actually need — organized by function, with rough costs so you can budget before you start shopping.
Use this alongside our 5-gallon bucket build guide if you’re assembling a DIY unit from scratch, or as a quick reference for what to budget beyond the unit itself if you’ve gone with a manufactured option.
Solids Handling
These are the core items directly involved in collecting and containing solid waste — the foundation of any build, DIY or manufactured, before anything else is added.
- Solids container — a 5-gallon bucket ($5–8 each) for DIY builds, or the integrated bin on a manufactured unit
- 2–3 containers for rotation (DIY only) — so a filled bucket can wait for disposal while a clean one is in active use
- Compostable liner bags sized to your container — a few dollars per pack, replaced every 8–10 uses on most systems
- Seat — a snap-on lid for a bare bucket setup, or a standard toilet seat if building a full enclosure
Liquids Handling
- Urine diverter — homemade (near-free) or purchased ($25–$100); see our full DIY urine diverter guide
- Tubing — typically 3/8″ ID, a few dollars for enough length to reach your liquids container
- Liquids container — a jug or bottle low and stable enough not to tip, ideally with a wide enough opening for easy emptying
Odor Control
This is arguably the category where your specific choice matters most for day-to-day happiness with the finished build — see our full carbon additive comparison for the detailed tradeoffs between each material.
- Carbon additive — coco coir (~$15–20 per 11 lb brick), peat moss (~$35–40 per 2.2 cu ft bag), or coarse untreated sawdust (often free); see our full comparison
- Scoop — for adding additive after each use; any small scoop or cup works
- Storage container for additive — an airtight bin keeps material dry between uses
Ventilation (Recommended, Optional for Tier 0–1 Budget Builds)
- Small computer-style fan — commonly 60x60x25mm, roughly $15 standalone
- Vent hose/tubing — routes air from the chamber to an exterior termination point
- Exterior vent cap — with insect screen to prevent debris and pests entering
- Complete basic vent kit — $15–$70 if buying pre-assembled rather than sourcing individually
Tools (One-Time, Not Consumed)
- Drill
- Jigsaw (if cutting a seat opening or building an enclosure)
- Measuring tape
- Caulking gun and appropriate sealant
- Basic hand tools (screwdriver, utility knife)
Cleaning and Maintenance Supplies
- White vinegar (for cleaning — avoid bleach, which harms the beneficial bacteria doing the composting work)
- Cleaning cloths or an enzyme cleaner
- Gloves for emptying tasks
Enclosure Materials (If Building a Box or Bench)
- 3/4″ plywood for structural panels
- Screws and basic hardware
- Moisture-resistant finish or paint if the enclosure will see regular splash exposure
What You Don’t Need
It’s worth calling this out clearly since it surprises some first-time buyers researching this category for the first time — the absence of these items is actually part of what makes composting toilets appealing in the first place, not a limitation.
A few things people sometimes assume are required but aren’t: no water line or plumbing of any kind, no electrical hookup for a Tier 0–2 DIY build (only relevant if adding a powered vent fan), and no specialized chemicals — the entire system relies on the mechanical and biological principles covered in our how composting toilets work guide, not any added product beyond carbon additive itself.
A Sample Shopping Trip
To make this list concrete, here’s what a single hardware store and online order pair might actually look like for a Tier 2 build (DIY with a purchased diverter and basic vent kit): from the hardware store, pick up two or three 5-gallon buckets, a roll of tubing, caulk, basic screws, and a bottle of white vinegar for cleaning. Online, order a purchased urine diverter kit, a basic vent fan kit, a case of compostable liner bags sized to your bucket, and a brick of coco coir. That’s the entire shopping list for a genuinely complete Tier 2 build — no specialty stores, no rare parts, and nothing that requires more than two separate orders to gather.
A Printable Checklist Format
If you’d rather work through this as a simple checklist while shopping rather than reading full sections, the essentials break down to seven line items: solids container, seat/lid, liner bags, urine diverter, tubing, liquids container, and carbon additive. Everything else on this page — ventilation, tools, cleaning supplies, enclosure materials — is a genuine enhancement rather than a strict requirement to get a functioning unit up and running. Print or screenshot just those seven items if you want the fastest possible path to a working first build, and add the rest as budget and time allow.
Parts Specific to a Manufactured Unit
If you’ve gone with a manufactured unit rather than DIY, most of the parts list above is already integrated into the unit itself — the solids container, diverter, and often the fan all come as one package. What you’ll still need separately: your chosen carbon additive (rarely included long-term, though some units ship with a small starter supply), compostable liner bags if your model uses them, cleaning supplies, and — for models like Nature’s Head — a separately sold power adapter or certain vent cap styles, which are easy to overlook when budgeting since they’re not always bundled with the base unit. Check your specific model’s included-versus-separate parts list before assuming everything you need arrives in one box.
Replacement Parts to Keep on Hand
Once your build or manufactured unit is up and running, a small stock of replacement parts prevents a minor failure from taking your only toilet out of service. A spare fan (if your setup uses one) is the single most useful item to keep on hand, since it’s the component most likely to eventually need replacement across every brand and DIY design covered on this site. A spare set of gaskets or seals, a backup diverter if you built or bought an inexpensive one, and an extra length of vent tubing round out a reasonable spare-parts kit for anyone relying on their composting toilet as a primary bathroom rather than an occasional-use backup.
Related Guides
- 5-gallon bucket composting toilet guide
- DIY urine diverter guide
- Cheapest way to start a composting toilet
Frequently Asked Questions
Do I need everything on this list for a basic build?
No — the solids handling, liquids handling, and odor control sections are the genuine essentials. Ventilation, enclosure materials, and some cleaning supplies are recommended upgrades rather than strict requirements, especially for a first budget-tier build.
Where should I buy these parts?
- Buckets, plywood, and basic hardware: any hardware store
- Purpose-made diverters and vent kits: specialty sellers on Etsy and eBay
- Carbon additive: garden centers (peat moss), online retailers (coco coir), or a local sawmill (sawdust)
Can I substitute items on this list with what I already have?
Often yes, particularly for containers and tools — a similarly sized bucket, jug, or bin from around the house works fine in most cases. The diverter and carbon additive are the two areas where quality matters more than convenient substitution.
How often will I need to restock consumable items?
Carbon additive and liner bags are the main recurring purchases, typically restocked every few weeks to a couple of months depending on usage — see our general maintenance guide for typical emptying schedules that drive this frequency.
Should I buy extra parts upfront, or order as I go?
For the essential seven items, order everything upfront so your first build isn’t stalled waiting on a missing piece. For consumables like carbon additive and liner bags, a single restock cycle’s worth is plenty to start — no need to stockpile months of supply before you’ve even confirmed your setup works as expected.
Is there a way to get all of these parts in one order rather than shopping around?
Some purchased diverter sellers bundle a fuller kit including vent components and sometimes carbon additive, which can simplify sourcing into a single order at a modest premium over piecing everything together separately. Weigh the convenience against the cost difference based on how much you value fewer separate orders and shipping charges.
Do I need different parts for a permanent cabin install versus a portable camping setup?
The core seven essentials stay the same either way. A permanent install typically adds enclosure materials and possibly more robust ventilation, while a portable setup prioritizes lightweight, easily packed components — see our enclosure building guide for the fixed-installation specifics.