
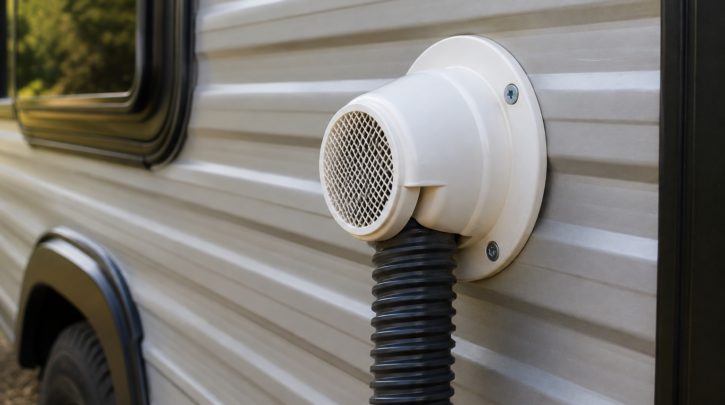

Venting is the single most important system on a composting toilet, and the one most often under-planned in a van build. It’s easy to treat it as an afterthought once the toilet itself is mounted, but the fan and hose routing are doing more work than people expect — get this wrong and even a genuinely good toilet will underperform.
Why Venting Matters More Than People Expect
The fan and vent hose do two jobs at once: they supply the oxygen aerobic bacteria need to break down solids without odor, and they create negative pressure inside the unit that pulls any residual smell outside rather than into the cabin. A poorly vented composting toilet — even a good one from a reputable brand — will underperform a well-vented cheaper one, which is exactly why we’re dedicating a full guide to this single system rather than treating it as a footnote in a general installation walkthrough.
Hose Diameter and Fan Specs by Brand
| Brand | Vent hose/pipe | Fan draw | Max recommended run |
|---|---|---|---|
| Nature’s Head | 1-1/4″ PVC pipe (5′ hose included) | 1.68A over 24 hrs at 12V | Extendable; longer hose sold separately |
| OGO Origin | ~40mm (DN40 HT pipe compatible) | Low-draw 12V fan | Extend with standard HT pipe as needed |
| Separett Villa | Standard flexible hose | 0.06 kWh/24h (very low draw) | Up to 20 ft with up to three 90° elbows |
| Air Head | ~48mm hose | 12V / 60mA / 0.72W | Flexible routing, side-mountable either side |
| CompoCloset Cuddy | Built-in fan + carbon filter | ~0.1A | Compact — designed for short internal runs |
Routing Best Practices
- Keep it short and straight. Every elbow reduces airflow — most manufacturers rate their fans against a specific number of bends, and Separett explicitly rates for up to three 90° elbows over 20 feet as a concrete example of how quickly that budget adds up.
- Route away from air intakes. Never terminate near a roof vent fan’s intake, a window, or a door — the exhausted air can otherwise re-enter the cabin almost as fast as it left, defeating the point of active venting entirely.
- Avoid low points that can trap condensation. A hose that dips before rising to the exterior vent can collect moisture and reduce airflow over time, and it’s a surprisingly common oversight in builds where the vent run has to navigate around other components.
- Use the manufacturer’s vent cap. These are sized and screened specifically for that brand’s hose diameter — a generic vent cap can be a looser, leakier fit even when it technically fits the hole.
Roof Vent vs. Wall Vent
Wall-mounted vent termination is more common in van builds since it’s a shorter, more direct run from a floor-mounted toilet, and it avoids the extra length a roof run typically requires. Roof venting requires a longer run but keeps the exterior penetration away from ground splash and road spray, and it’s preferred in some marine installs for exactly that reason. Either approach works — pick based on your specific floor plan and how short you can realistically keep the run, since run length and elbow count matter more to overall performance than which surface you vent through.
Sizing an Inline Booster Fan for Longer Runs
If your build genuinely requires a longer vent run than your model’s rated maximum — a common situation in larger conversions where the bathroom sits far from any usable exterior wall — some manufacturers offer or support an inline booster fan rather than relying solely on the unit’s built-in fan to push air the entire distance. Before adding one, check your specific model’s guidance, since not every unit’s electrical design supports an additional inline fan without modification, and adding one to a unit that doesn’t support it can create more problems than it solves.
Troubleshooting Weak Airflow
- Check for a kinked or crushed hose section, especially where it passes behind cabinetry that’s flexed slightly during travel
- Confirm the fan is receiving full voltage — a failing 12V wiring connection can under-power the fan without killing it outright, which produces a partial, hard-to-diagnose symptom rather than an obvious total failure
- Inspect the exterior vent cap’s insect screen for debris buildup, which accumulates gradually enough to go unnoticed for months
- If you’ve added length beyond the manufacturer’s rated maximum, airflow loss is expected — shorten the run or add an inline booster fan if available and supported for your model
Materials and Fittings You Can Substitute
The vent hose and pipe fittings included with each unit are generally sufficient, but if you need to extend a run or work around an unusual routing path, standard hardware-store PVC and HT (high-temperature) drain pipe in the matching diameter is widely compatible across brands, since none of these manufacturers use genuinely proprietary fittings for the straight sections. Where it’s worth sticking with manufacturer parts specifically is at the two connection points — where the hose meets the toilet body, and where it meets the exterior vent cap — since these are the fittings engineered for a tight, specific seal, and substituting a generic connector at either end is the most common source of small air leaks that quietly reduce ventilation efficiency without being an obvious, total failure.
Climate Considerations for Venting
Ventilation needs shift somewhat with climate, and it’s worth adjusting your expectations rather than assuming a single setup performs identically everywhere. In hot, humid climates, the fan is working against higher ambient moisture in the incoming air itself, which means the same airflow rate does slightly less drying work than it would in a dry climate — pairing solid ventilation with slightly more generous carbon additive use compensates for this. In cold climates, condensation inside the vent hose becomes a more realistic risk, particularly on a run that isn’t perfectly straight and rising, so it’s worth double-checking for low points where moisture could collect and partially block airflow during winter use specifically.
Fan Noise and Where to Route Ductwork to Minimize It
The fans used across these brands are generally quiet by design, but sound can carry more than expected through a rigid vent hose acting almost like a small duct. If you’re sensitive to noise or your bathroom sits close to a sleeping area, running the hose through a section with a bit of flexible, sound-dampening material rather than an entirely rigid pipe run can noticeably reduce the hum that transmits through the vent system itself, separate from the fan’s own operating noise. This is a minor consideration compared to airflow performance, but worth factoring in during routing if noise is a genuine concern for your specific build and sleeping arrangement.
Inspecting Your Venting Annually
Beyond the weekly tissue test covered in our maintenance guide, it’s worth doing a more thorough annual inspection of the entire vent path from toilet to exterior termination, ideally at a time when you can fully access the run rather than just checking the two visible ends. Disconnect the hose at the toilet body and visually inspect the interior for any buildup, check every joint and fitting for signs of the sealant drying out or cracking, and confirm the exterior vent cap’s screen is still fully clear rather than partially obstructed in a way that hasn’t yet reduced airflow enough to notice day to day. This kind of proactive check catches slow-developing issues well before they become an odor complaint, which is a considerably more pleasant time to discover and fix a small problem.
Related Guides
- Composting toilet installation in a van
- Composting toilet smell & odor guide
- Best composting toilets for van life
Frequently Asked Questions
Can I run the vent hose without a fan, passively?
Some setups do this successfully in warm climates with a favorable wind-driven vent cap, but active fan ventilation is far more reliable and is what every manufacturer designs around by default for a reason.
What happens if my vent hose is too long for my model?
Airflow drops off, which can lead to slower composting and a higher chance of odor. Stay within the manufacturer’s rated maximum length and elbow count, or add a supported inline booster fan if your build genuinely can’t avoid a longer run.
Do I need a separate 12V circuit just for the fan?
A dedicated fused circuit is best practice so a fault elsewhere in your electrical system doesn’t take down your ventilation along with it, but it’s not strictly required if your existing circuit has comfortable margin for the fan’s low draw.
How do I know if my current venting setup is actually adequate, or just “good enough for now”?
Run the tissue test at the exterior vent regularly, not just once at install — a subtle decline in airflow over months is easy to miss day to day but shows up clearly if you check periodically and compare against how it performed when new.
Is it worth adding a second, backup fan to the same vent run?
For most builds, no — a single properly rated fan with good hose routing is sufficient, and adding redundancy here is generally more complexity than the actual failure risk justifies. It’s a more reasonable consideration specifically for a fixed cabin installation where the unit runs continuously for years without the kind of regular hands-on inspection a van owner naturally does during routine maintenance.