
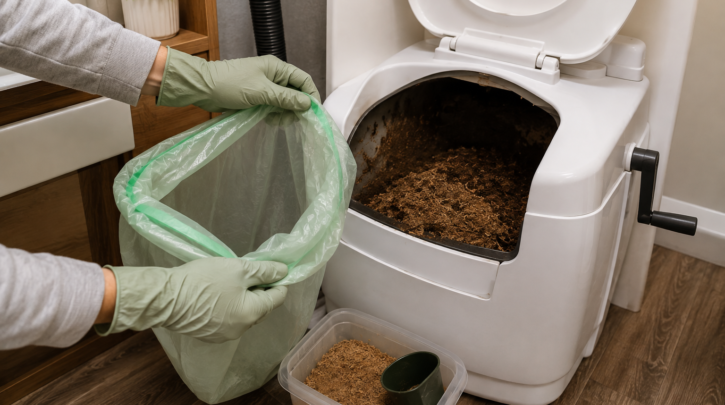

A composting toilet’s entire reputation for being low-hassle or high-hassle comes down to whether you stay ahead of a short, predictable maintenance routine. There’s genuinely not much to it once you know the schedule — the problems people run into almost always trace back to skipping a step for a week or two, not to the technology itself being unreliable.
Emptying the Liquids Container
Frequency depends on tank size and number of users — expect every 1–3 days for one or two full-time users with a standard-size urine bottle. This is genuinely the more frequent of the two chores, even though it gets less attention than solids emptying in most discussions of the category.
- Disconnect or remove the liquids container per your model’s specific release mechanism
- Empty into a toilet, a greywater-approved drain, or dilute it (roughly 1:8 with water) and use it as a nitrogen-rich fertilizer on non-edible plants — see our safety guide before doing this for the first time
- Rinse the container; a splash of water with a few drops of vinegar helps prevent mineral buildup and the ammonia smell that develops in containers left unrinsed for extended periods
- Reconnect and confirm the seal or fitting is secure before use — a loose seal here is a surprisingly common source of small leaks
Emptying the Solids Chamber
Frequency: roughly every 3–6 weeks for one to two full-time users, faster with more users or if you’ve been using less carbon additive per visit than recommended.
- Check local regulations first — many jurisdictions require solids to go into a permitted composting system rather than general trash; see our legal requirements guide for specifics by state
- Most units have an agitator or mixing crank — give it several turns before removing the bag to help settle and mix contents evenly
- Remove the compostable liner bag, seal it, and transfer it to your designated compost bin, pit, or approved disposal method
- Add a fresh layer of carbon additive — sawdust, coco coir, or peat moss — to the empty chamber before reinstalling the liner
- Wipe down the chamber interior with a diluted vinegar or enzyme cleaner — avoid bleach, which can disrupt the bacterial activity you’re actually relying on to do the work
Routine Cleaning Schedule
| Task | Frequency |
|---|---|
| Wipe down bowl/seat exterior | Daily or after each use |
| Check fan is running (listen/feel for airflow at vent) | Weekly |
| Empty liquids container | Every 1–3 days |
| Empty solids chamber, add fresh additive | Every 3–6 weeks |
| Inspect vent hose for kinks or blockage | Monthly |
| Deep clean seals/gaskets | Every 2–3 months |
What to Keep on Hand
A small, predictable supply kit prevents most emergency scrambles. Keep at least one full spare bag of your carbon additive of choice, a handful of compostable liner bags sized for your specific model, a bottle of white vinegar for cleaning and rinsing, and — if your unit uses one — a spare fan, since these are usually inexpensive and simple to swap in without tools. Running out of carbon additive mid-trip is a far more common cause of odor complaints than any actual mechanical failure.
Troubleshooting Common Issues
Fan isn’t running or is unusually loud
Check the power connection first, then inspect the fan housing for debris or a failing bearing. Most replacement fans are inexpensive and swap in without specialized tools, so this is rarely a costly fix.
Mixture in the solids chamber looks too wet
Add more carbon additive immediately, and double-check the urine diverter isn’t leaking or misaligned — this is the most common root cause by a wide margin. See our full odor troubleshooting guide for a complete diagnostic walkthrough.
Mixture looks too dry / not breaking down
Less common, but it can happen in very dry, hot climates. A small amount of added water — not urine — alongside continued regular agitation usually resolves this within a few days.
Crank or agitator feels stuck
Usually caused by an overfull chamber compacting the mix beyond what the mechanism can move. Empty a portion if possible, or if you’re near your usual schedule anyway, empty it fully now and reduce fill level going forward before it becomes a recurring issue.
Seasonal & Long-Term Care
Maintenance needs shift noticeably with the seasons, and planning for that ahead of time avoids most of the surprises new owners run into during their first full year of ownership.
- Winterizing: if the unit will sit unused in freezing temperatures, empty both chambers fully and leave lids open slightly to prevent moisture buildup and cracking of plastic components over the cold months.
- Hot, humid climates: expect to add carbon additive somewhat more generously than the baseline recommendation, since ambient humidity works against the moisture control the additive is providing.
- Gaskets and seals: replace at the first sign of cracking — a failed seal is a sneaky, often hard-to-diagnose source of both odor and small leaks that gets blamed on other causes first.
- Fan lifespan: most computer-style fans used in these units last roughly 2–5 years under continuous use; keep a spare on hand if you’re full-timing, since a failed fan mid-trip is a genuinely inconvenient time to discover you need one.
Cleaning Products to Avoid and Why
It’s tempting to reach for whatever bathroom cleaner is already under the sink, but a few common products actively work against a composting toilet rather than just being neutral. Bleach and other strong disinfectants kill the aerobic bacteria the solids chamber depends on, which can set back the composting process by days or weeks after even a single thorough cleaning — the chamber will still function afterward, but you’re effectively resetting the bacterial colony that was doing the work. Heavily fragranced cleaners and air fresheners can have a similar, if less severe, effect, and some fragrance oils are specifically known to interfere with bacterial activity in enclosed spaces.
Diluted white vinegar or a purpose-made enzyme cleaner are the safer defaults for both the solids chamber and the urine container. Enzyme cleaners in particular are worth keeping stocked since they actively support the same kind of bacterial breakdown the toilet relies on, rather than working against it.
Building a Realistic Weekly Routine
Most new owners overthink the schedule at first and then settle into something close to this within the first month: liquids get emptied every other day or so, timed loosely around whenever it’s convenient rather than a strict calendar; a quick fan check happens whenever you’re already near the unit, rather than as a dedicated task; and solids get checked roughly every couple of weeks to gauge how close the chamber is to its emptying point, with an actual empty happening somewhere in the 3–6 week range depending on how many people are using it. The goal isn’t rigid adherence to a printed schedule — it’s building enough awareness of your own unit’s fill rate that emptying happens before it becomes urgent, rather than reactively once something’s already gone wrong.
Traveling or Away From the Unit for Extended Periods
If you’re stepping away from a van, boat, or cabin for more than a week or two — a flight home, a work trip, seasonal storage — it’s worth emptying both containers fully before you leave rather than trusting them to hold until you’re back. A liquids container left sitting for an extended period will develop a strong ammonia smell that’s unpleasant but harmless, while a solids chamber left mid-cycle for weeks without any airflow or fresh additive can shift toward anaerobic conditions even if it wasn’t overfull to begin with. Neither scenario causes lasting damage to the unit, but both mean you’ll come back to a much less pleasant first five minutes than if you’d emptied before leaving. If the unit will be sitting for a full season, combine this with the winterizing steps above — an empty, slightly-open chamber handles extended downtime far better than one left closed up with old material still inside.
Related Guides
- Composting toilet smell & odor guide
- Using composting toilet output as fertilizer — safety guide
- Composting toilet parts list — what you actually need
Frequently Asked Questions
What carbon additive lasts longest between emptying?
Coco coir tends to hold moisture more efficiently than sawdust per volume, which can modestly stretch the time between empties. Full comparison in our sawdust vs. coco coir vs. peat moss guide.
Can I put solid waste straight into my garden compost pile?
Not directly into a pile intended for edible-plant soil without further composting time, and in many areas, not without following specific setback and containment rules first. See the safety guide linked above before doing this.
How do I know if I’m not adding enough carbon additive?
The main signs are visible moisture pooling in the chamber, a noticeably ammonia-like or sour smell, or the mixture failing to break down at all between scheduled empties. Increase the amount added per use and reassess after a few days.
Is it normal for maintenance needs to change after the first few months of ownership?
Yes — most owners report needing more trial and error in the first month than afterward, since dialing in exactly how much carbon additive your specific usage pattern needs takes a bit of observation. Once you find your routine, it becomes close to automatic.