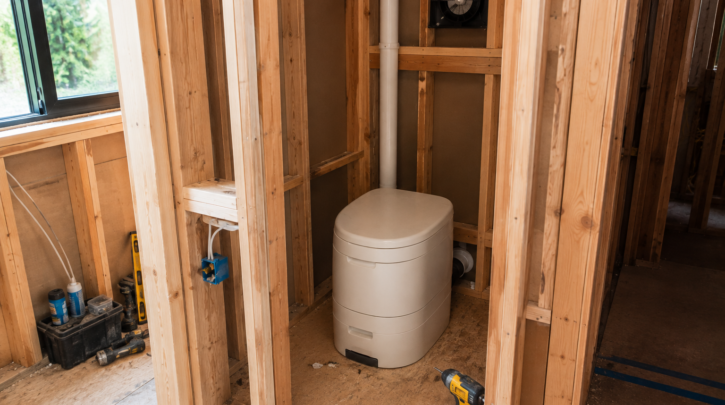

Whether you’re building a dedicated bathroom around a composting toilet in a cabin, or a simple standalone outhouse-style enclosure on undeveloped land, the same core design principles apply. Here’s what actually matters, beyond just framing four walls around a toilet.
Sizing the Space
Plan for more than just the toilet’s footprint. You need clearance on at least one side to comfortably reach the solids bin and urine container during emptying, headroom above the unit to lift bins straight up and out, and enough total floor space to actually turn around and use the space comfortably — a genuinely cramped enclosure makes routine maintenance a chore in a way that discourages keeping up with it. A minimum of roughly 3×4 feet of clear floor space around a self-contained unit is a reasonable starting point for most models, though check your specific unit’s dimensions and add real clearance beyond the base footprint, not just enough to technically fit it.
If you’re building around one of the larger cabin-oriented units like the Sun-Mar Excel rather than a compact van-style toilet, scale these clearance numbers up accordingly — a bigger unit needs proportionally more room to service comfortably, not just more room to physically fit.
Ventilation Planning
The enclosure itself needs its own ventilation strategy independent of the toilet’s own vent system. A small operable window or a passive vent near the ceiling helps manage general humidity and any residual odor beyond what the toilet’s own fan handles, and it’s worth planning the toilet’s exterior vent termination point during the enclosure design specifically — see our general venting and ventilation guide for routing principles that apply here just as much as in a van. Avoid placing the enclosure’s own window or vent directly above or beside the toilet’s vent termination point, for the same reason you’d avoid it in any other installation: you don’t want exhausted air re-entering the space it just left.
If the enclosure is part of a larger structure with its own HVAC or general ventilation system, make sure the composting toilet’s dedicated vent operates independently of that system rather than sharing ductwork — mixing the two can pull odor into parts of the building far from the bathroom itself, which is considerably harder to trace and fix than an isolated, dedicated vent run.
Choosing Materials
Moisture resistance matters more here than in a typical room, given the humidity a bathroom naturally generates plus whatever the composting process itself adds to the air. Moisture-resistant or cement-based backer board holds up better than standard drywall for wall surfaces, particularly near the toilet itself. For flooring, a sealed or moisture-resistant surface — vinyl, tile, or sealed wood — outperforms bare untreated wood, which can absorb moisture and odor over years of use in a way that’s difficult to fully clean once it’s set in. If you’re building in a climate with real humidity swings, consider a vapor barrier in the wall assembly itself, the same way you would for any bathroom construction.
Framing for Access and Future Maintenance
Design the enclosure with the assumption that you’ll need to service the toilet’s fan, check vent connections, and eventually replace parts over years of use — not just install it once and forget the access question. If cabinetry or built-in seating will surround the unit, include a removable panel or hinged access point specifically for the vent hose and fan wiring, rather than building a fully enclosed structure that would need to be partially demolished for a simple fan replacement down the line. This is a small amount of extra planning during construction that saves real frustration years later.
Lighting and Electrical
Plan a dedicated circuit for the toilet’s fan (and heater or agitator motor, if your model uses one) separate from general room lighting, so a tripped breaker on one doesn’t take down the other. If you’re building a fully off-grid standalone enclosure without existing electrical infrastructure nearby, a small dedicated solar panel and battery specifically for the toilet’s needs is often simpler than running a long wire run from a distant main power source — worth weighing against your specific site’s layout.
Insulation for Year-Round Use
If the enclosure will see use through cold months, insulating the walls, floor, and roof the same way you would any occupied room pays off twice over — it keeps the space comfortable for whoever’s using it, and it helps maintain the more moderate, stable temperatures that support consistent aerobic composting activity rather than letting the chamber swing with outdoor temperature extremes. For a standalone unheated structure used only seasonally, insulation matters less, though it still helps moderate the temperature swings that can otherwise slow composting during cooler weeks even within a warm season.
Standalone Outhouse-Style Enclosures
For a fully standalone enclosure not attached to a main structure — common on undeveloped land or as a secondary bathroom for a workshop or guest area — the same principles apply, with a few additions: elevate the structure slightly off the ground on a simple pier or skid foundation to prevent moisture wicking up from the soil, and plan a covered, weatherproof pathway or at least good exterior lighting if it will be used after dark. Check your local setback requirements from property lines and water sources before finalizing the location — these often apply to any wastewater-adjacent structure, not just septic systems specifically, and are covered in more general terms in our legal requirements and permits by state guide.
Privacy and Sound Considerations
A dedicated composting toilet room deserves the same privacy consideration as any bathroom, but a couple of details specific to this category are worth planning for. Solid-core doors with a proper latch matter more here than in a typical closet or utility space, precisely because it’s a bathroom. If the enclosure shares a wall with a sleeping area, consider basic sound dampening in that wall — a fan’s low hum is generally unobtrusive, but a hand-crank agitator’s mechanical sound during use can carry more than people expect through a thin, uninsulated wall late at night.
Storage for Supplies
Build in a small amount of dedicated storage within or near the enclosure for the supplies covered in our maintenance guide — carbon additive, compostable liner bags, cleaning supplies, and a spare fan if you’re keeping one on hand. A simple shelf or small cabinet specifically for these items keeps your routine maintenance genuinely routine, rather than turning each emptying into a scavenger hunt for supplies stored somewhere else in the building. This is a small design detail that’s easy to skip during initial construction and mildly annoying to retrofit later.
Common Mistakes to Avoid
- Building the enclosure too tight around the unit, leaving no real clearance for bin removal or comfortable use
- Skipping a dedicated access point for fan and vent maintenance, forcing future disassembly of finished cabinetry
- Using standard, non-moisture-resistant materials that degrade faster than expected in a humid small space
- Placing the enclosure’s own ventilation too close to the toilet’s exterior vent termination, causing exhausted air to re-enter
Related Guides
- Composting toilet venting/ventilation for vans
- Best composting toilets for cabins
- Legal requirements/permits by state
Frequently Asked Questions
Do I need a permit to build a standalone outhouse-style enclosure?
Often yes, particularly if it’s a permanent structure rather than a temporary one — check both building permit requirements for the structure itself and any wastewater-related permitting for the composting toilet, since these can be separate processes handled by different local offices.
What’s the minimum size enclosure I can build around a self-contained unit?
This depends on your specific model’s footprint, but plan for meaningfully more than the bare minimum — a space that only just fits the unit with no clearance makes routine emptying and maintenance a genuine chore, which tends to discourage keeping up with it.
Can I use a composting toilet in an unheated enclosure through winter?
The toilet will continue to function, though composting slows significantly in cold temperatures, and any liquid left in containers risks freezing. If the enclosure won’t be heated, plan to empty both chambers fully before a hard freeze rather than leaving material in them through the coldest months.
Should the enclosure be insulated?
For a year-round or cold-climate installation, yes — insulation helps maintain the more moderate temperatures that support consistent aerobic composting activity, and improves comfort for anyone using the space in winter regardless of the toilet’s own function.