
A manufactured composting toilet costs $650 to $2,000+. A DIY build using the exact same core principles — urine diversion, carbon additive, aerobic decomposition — can be done for well under $150 if you’re willing to build it yourself. This page covers what you actually need to know before starting, and links to the more detailed guides for each part of the build.
The Core Principle Doesn’t Change
Every manufactured unit covered elsewhere on this site — from a $180 BOXIO to a $2,000 Sun-Mar Excel — relies on the same three things covered in our how composting toilets work guide: separating urine from solids, adding a carbon-rich material to manage moisture and odor, and letting aerobic bacteria do the actual work. A DIY build gets you all three of these for the cost of materials rather than a finished product’s markup, provided you’re willing to do the assembly yourself and accept a less polished result than a manufactured unit.
The Two Basic DIY Approaches
The 5-Gallon Bucket Method
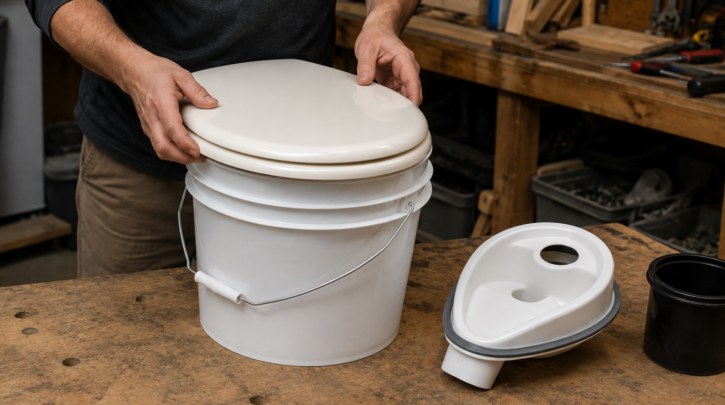
The simplest and most common DIY approach: a standard 5-gallon bucket for solids, a snap-on toilet seat lid, and either a purchased or homemade urine diverter to route liquids into a separate container. This is covered in full step-by-step detail in our 5-gallon bucket composting toilet guide, including exact materials, costs, and assembly steps.
A Built Box or Bench Enclosure
A more finished approach: build a plywood box or bench-style enclosure around a bucket-and-diverter setup, giving it the look and stability of a manufactured unit while keeping the underlying DIY components. This takes more woodworking effort and time than the bare-bucket method, but results in something that looks and feels considerably more like a normal bathroom fixture — worth the extra effort for a permanent van build or cabin bathroom, less necessary for an occasional-use camping setup.
The One Component Worth Buying Rather Than DIYing
You can build a urine diverter yourself from a second bucket cut into shape, and plenty of builders do exactly that successfully. But a purchased diverter — typically $25 to $100 depending on style and whether it includes a ventilation attachment — is the one place where spending a bit more genuinely pays off in reliability. A commercially made diverter has a proven shape that actually separates liquid and solid waste reliably, while a homemade version needs some trial and error to get the geometry right. If your budget allows for one splurge in an otherwise bare-bones build, this is it.
Tools You’ll Actually Need
Most DIY builds need only basic tools: a drill, a jigsaw if you’re cutting a seat opening into plywood, a measuring tape, and a caulking gun for sealing gaps around the diverter and any vent penetrations. None of this requires specialized skills beyond basic comfort with a drill and saw, which is part of why this remains such an accessible project for a first-time builder. If you’re building the more finished box-and-bench version rather than a bare bucket, add a few basic woodworking clamps to the list — they make assembly meaningfully easier than trying to hold pieces in place by hand while screwing them together.
Free vs. Paid Plans
Paid plans — including our own downloadable build plans — typically offer more detailed cut lists, clearer diagrams, and a more finished, considered design than a free YouTube tutorial, similar to the difference between a free recipe blog post and a properly tested cookbook recipe. See our full DIY composting toilet plans guide for a detailed breakdown of what free and paid options actually offer.
Carbon Additive: Get This Part Right
Your choice of carbon additive matters more in a DIY build than in a manufactured unit, since you don’t have an engineered chamber shape or agitator compensating for a less-than-ideal material choice. Coco coir is the most forgiving and widely recommended option for DIY builds specifically; sawdust works but needs to be coarse rather than fine, and peat moss works but compacts over time. Full comparison, including real cost-per-use figures, in our sawdust vs. coco coir vs. peat moss guide.
Ventilation Still Matters
A DIY build benefits from active ventilation just as much as a manufactured one does — the same principles covered in our general venting and ventilation guide apply directly. Basic DIY-friendly vent kits (a small computer-style fan plus tubing) run $15 to $70 depending on how complete a kit you buy, and are a worthwhile addition even on an otherwise bare-bones build, since ventilation is one of the biggest factors separating a DIY toilet that works well from one that develops odor problems.
Safety and Sanitation Basics
A DIY build carries the same basic safety considerations as any manufactured composting toilet, and it’s worth taking them just as seriously simply because you built it yourself rather than bought it from a certified manufacturer. Keep hands away from solid waste directly — use the bag-and-tie method rather than handling material loose — and wash hands thoroughly after any emptying task. Never use finished DIY compost on edible plants regardless of how long it’s cured; see our full fertilizer safety guide for the specific reasoning and safe handling practices, since this caution applies identically whether your toilet came from a factory or your own garage.
What You Give Up Compared to a Manufactured Unit
- No warranty or manufacturer support — you’re troubleshooting your own build rather than calling a company’s customer service line
- Less polished fit and finish — even a well-built DIY unit generally looks and feels more utilitarian than a manufactured product
- More trial and error — expect to make small adjustments to seating position, diverter fit, or ventilation after your first few uses
- Smaller typical capacity — a single 5-gallon bucket holds meaningfully less than a manufactured unit’s solids bin, meaning more frequent emptying unless you build in rotation between multiple buckets
Is DIY Right for You?
DIY makes the most sense for genuinely budget-constrained builds, for anyone who enjoys the building process itself, and for situations where you want to test the composting toilet concept before committing real money to a manufactured unit. It makes less sense if you want a warranty, the smoothest possible day-to-day experience, or you’re not particularly interested in the build process itself — in which case the budget manufactured tier covered in our best budget composting toilets under $300 guide is worth a look instead, since it closes much of the price gap while removing the DIY effort.
A Realistic Total Cost Breakdown
Putting real numbers next to the whole project: 2–3 five-gallon buckets run roughly $15–25 total, a purchased urine diverter runs $25–100 depending on style, a liquids container and tubing add another $10–20, compostable bags run a few dollars per pack, and carbon additive costs $15–40 depending on which material and how much you stock up on at once. A basic vent kit, if you add one, runs $15–70. All told, a complete first build with a purchased diverter and basic ventilation typically lands in the $100–$250 range — genuinely a fraction of even the cheapest manufactured option covered elsewhere on this site, while still delivering the same core urine-diversion and composting functionality.
Where to start: read our 5-gallon bucket composting toilet guide for the exact step-by-step build, pick your carbon additive using our comparison guide, and decide between free and paid plans using the breakdown in our DIY plans guide. Together, these three pages cover everything needed to go from this overview to an actual finished, working toilet.
Related Guides
- 5-gallon bucket composting toilet guide
- DIY composting toilet plans — free vs. paid
- Sawdust vs. coco coir vs. peat moss
Frequently Asked Questions
Can a DIY composting toilet be as odor-free as a manufactured one?
Yes, provided you follow the same core principles — reliable urine diversion, consistent carbon additive, and active ventilation. A DIY build with a proven purchased diverter and a small fan performs comparably to a manufactured unit on odor control specifically.
How long does a basic DIY build take to complete?
A bare bucket-and-diverter setup can be assembled in an afternoon. A built box or bench enclosure adds real woodworking time, typically a full weekend for a first-time builder, depending on your tool access and experience level.
Is a DIY composting toilet legal to use in a permanent home?
This is a more complicated question than for a manufactured, NSF/ANSI 41 certified unit — see our legal requirements and permits by state guide, since a DIY build generally can’t carry that certification, which some jurisdictions require for permanent installations specifically.
Can I upgrade a DIY build with parts from a manufactured toilet later?
To a limited extent — a purchased urine diverter and vent kit are already essentially “manufactured parts” in most DIY builds. Full manufactured components like an agitator mechanism generally aren’t sold as standalone parts compatible with a DIY bucket setup.