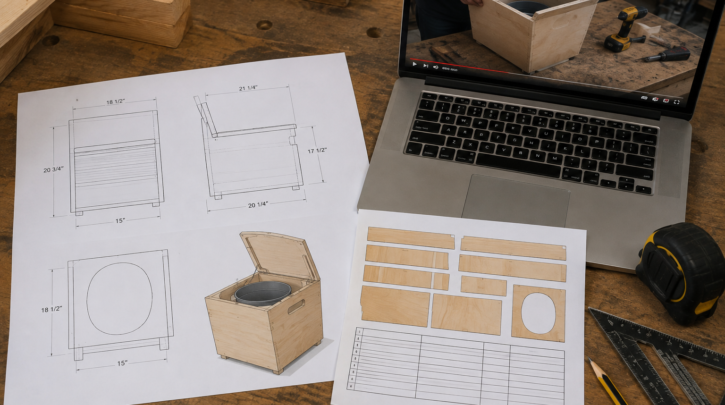

Plans for a DIY composting toilet range from a free five-minute YouTube video to a detailed, paid PDF with exact cut lists and diagrams. Both can get you to a working toilet — the difference is mostly in how much guesswork and trial-and-error sits between you and a finished build.
What Free Plans Typically Offer
Free resources — YouTube build videos, forum threads, blog posts from builders documenting their own projects — are genuinely sufficient for the basic bucket-and-diverter method covered in our 5-gallon bucket composting toilet guide. Joseph Jenkins’ Humanure Handbook, freely available in full online, remains the foundational reference for the underlying composting science and the classic bucket toilet method specifically, and it’s worth reading even if you end up following a different specific build.
The tradeoff with free plans is consistency and completeness. A YouTube video shows you one person’s specific build, which may or may not translate cleanly to your own available materials, tools, and space — measurements are sometimes approximate, and troubleshooting advice is scattered across comments rather than organized in one place. For a simple bucket build, this is a minor inconvenience. For a more ambitious built-box or bench enclosure, gaps in a free video’s instructions become more noticeable.
Online forums dedicated to van life, sailing, and off-grid living are another strong free resource, often more valuable than a single video specifically because you can ask follow-up questions and see how a design held up over months or years of real use, rather than just watching a single build-day snapshot. Search for your specific planned use case (van, boat, cabin) alongside “composting toilet DIY” to find community threads with accumulated troubleshooting knowledge specific to that context.
What Paid Plans Typically Offer
Paid plans — sold as downloadable PDFs, often through platforms like Gumroad or Etsy — generally include a complete cut list, precise diagrams, a full parts and hardware list with sourcing suggestions, and troubleshooting guidance organized in one document rather than scattered across video comments. Our own detailed build plans are available here: Composting Toilet Guide’s DIY plans. Expect to pay anywhere from a few dollars for a basic digital plan to $20–$40 for a more comprehensive set with multiple design variations.
What You’re Actually Paying For
It’s worth being clear-eyed about what a paid plan genuinely adds over free resources, since the underlying technology — urine diversion, carbon additive, aerobic decomposition — is identical either way and isn’t proprietary to any specific plan seller. What you’re paying for is time saved: a tested, complete set of instructions rather than piecing together information from multiple sources, a cut list sized correctly the first time rather than through trial and error, and often a more finished aesthetic result if the plans include a built-box design rather than just a bare bucket setup.
Commercial Diverter Kits: A Middle Ground
A genuinely useful middle path between fully free and fully custom paid plans: buy a purpose-made urine diverter kit that comes with its own basic build plans included. Several sellers on platforms like Etsy and eBay offer diverter inserts in the $25–$100 range, with options like a “snap-on” model for a standard bucket lid, a “bucket-contained” model, or a “mounted” model for building into a custom enclosure — some bundled with a basic ventilation attachment for an additional $15–$70. A more complete starter kit — like NETTYgo’s separating toilet kit, which needs only a bucket and bag added — runs around $75 and includes a diverter, seat, and basic assembly guidance in one package.
This middle path is worth strong consideration for most first-time builders specifically because it removes the single biggest risk factor in a DIY build — a poorly-fitting homemade diverter — while still keeping the bulk of the project genuinely DIY and low-cost. You’re not paying a manufacturer’s full markup for an entire finished unit, just for the one component where a proven design matters most.
How to Choose
- Absolute lowest cost, comfortable improvising: free plans plus a homemade diverter
- Want reliable diversion without building your own: a purchased diverter kit with basic included instructions
- Want a complete, tested, finished-looking build: paid detailed plans, ideally paired with a purchased diverter
A Note on Plan Quality
Not every paid plan is automatically better than every free resource — quality varies considerably on both sides. Before buying any paid plan, check for reviews or evidence that other builders have successfully completed the design as described, the same due diligence you’d apply to any online purchase. A well-documented free build with an active comment section of other successful builders can genuinely outperform a poorly-reviewed paid product.
Matching Plans to Your Specific Build Context
Not all plans are written with the same end use in mind, and it’s worth confirming a plan actually matches your situation before buying or committing significant build time to it. A plan written around a stationary homestead bathroom may not translate cleanly to a moving vehicle’s space and weight constraints, while a van-specific plan may be more compact than necessary for a cabin where space isn’t as tight. If a plan doesn’t specify its intended context, look for evidence in the photos or dimensions given — a wheeled base or tie-down points suggest a mobile design, while a larger footprint or built-in shelving suggests a stationary one.
Adapting a Plan to Your Own Materials
Even a well-written plan often assumes specific materials or dimensions that may not exactly match what’s available at your local hardware store. Plywood thickness, bucket brand dimensions, and toilet seat sizing all vary slightly by manufacturer and region, and a good plan will note where minor substitutions are safe versus where exact dimensions genuinely matter — typically around the diverter fit and any seat cutout. When in doubt, dry-fit components before committing to any cuts or permanent assembly, the same practice a careful woodworker would follow on any project regardless of how detailed the plan is.
Reading Reviews and Build Logs Before Committing
Whether you’re eyeing a free video or a paid plan, the single best predictor of whether it’ll work well for you is evidence that other people have actually built it and reported back. Look specifically for comments or linked build logs from people who completed the project, not just people who watched or downloaded it — a plan with dozens of views but no documented completions tells you less than one with even a handful of “I built this and it works great” comments attached. This applies equally to free YouTube content and paid digital products; popularity alone doesn’t confirm a design actually works as described.
Whichever path you choose, pair your plans with our carbon additive comparison and our general maintenance guide — the plan gets you a working toilet, but ongoing material choice and routine care are what actually determine whether it stays odor-free for years of use.
Related Guides
- How to build a DIY composting toilet
- 5-gallon bucket composting toilet guide
- Composting toilet parts list — what you actually need
Frequently Asked Questions
Is the Humanure Handbook still relevant for a van or RV build?
The core composting science it covers applies universally, though it was written primarily around stationary homestead use — for a mobile build specifically, pair it with more vehicle-focused resources for installation and space-constraint guidance.
Do paid plans include a materials shopping list with current prices?
Good ones do, though prices for lumber and hardware shift over time regardless of when a plan was written — treat any listed prices as a rough guide and verify current costs at your own local suppliers before finalizing a budget.
Can I combine free video instructions with a paid diverter kit?
Yes, and this is a common and reasonable approach — use free video guidance for the general enclosure or box build, and a purchased diverter kit specifically for the one component where reliability matters most.
Are there licensing or copyright issues with using a free plan commercially, like for a rental van business?
This varies by the specific plan’s terms — a purely informational free video generally doesn’t restrict how you use the resulting build, but check specific licensing terms on paid plans before using them as the basis for multiple commercial units rather than personal use.
Do I need woodworking experience to follow a typical set of plans?
Basic comfort with a drill and saw is generally sufficient for most plans covering the bucket-and-diverter method — this is a beginner-friendly project by design, not one requiring advanced woodworking skill, though a built box or bench enclosure asks a bit more of a first-time builder than a bare bucket setup does.
Should I buy plans before or after buying my urine diverter?
Buy the diverter first if possible, or at least decide which style you’re using — many plans are written around a specific diverter mounting approach, and confirming yours matches before finalizing your build avoids the frustration of adapting a plan mid-project to fit a diverter it wasn’t designed around.