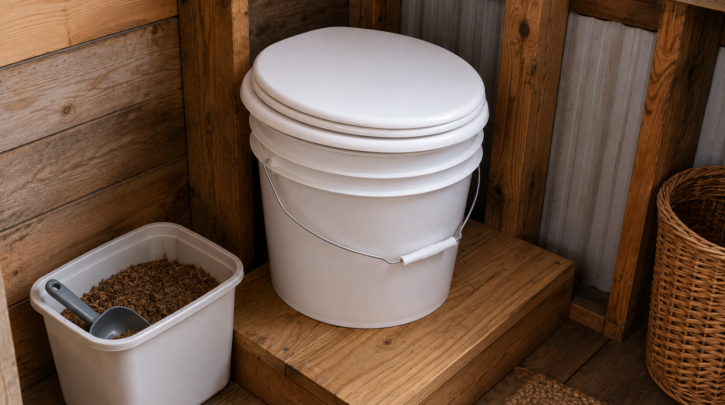

The 5-gallon bucket method is the simplest, cheapest, and most widely built DIY composting toilet design, and it’s the foundation nearly every other DIY approach builds on. Here’s exactly what you need and how to put it together.
What You Need
- 2–3 five-gallon buckets — one in active use, others for rotation while a filled one waits for disposal
- A snap-on toilet seat lid sized for a standard 5-gallon bucket
- A urine diverter — purchased ($25–$100) or homemade from a second bucket
- A liquids container — a jug or bottle that fits under the diverter’s spout, ideally low and stable so it can’t tip
- Compostable liner bags sized for a 5-gallon bucket
- Carbon additive — coco coir, coarse sawdust, or peat moss (see our comparison guide)
- Optional: a small vent fan kit ($15–$70) for active ventilation
Total cost for a bare-bones version: often under $75 if you build your own diverter and skip active ventilation. A more complete build with a purchased diverter and basic vent kit typically runs $100–$200 — still a fraction of any manufactured unit’s price.
Step 1: Choose Your Diverter Approach
This is the single most important decision in the build. A purchased diverter (styles include “snap-on,” “bucket-contained,” and “mounted,” depending on how you’re building the rest of the enclosure) has a proven, tested shape. A homemade diverter — built by cutting a second bucket into a semi-circular shape and joining the two halves with a pin and rubber washer — costs next to nothing but needs some trial and error to get the angle and fit right. If this is your first build, strongly consider the purchased option; you can always attempt a homemade version on a future build once you know what a well-functioning diverter should feel like.
Whichever route you choose, see our dedicated DIY urine diverter guide for a deeper walkthrough of both the purchased and homemade approaches, including sizing considerations and common fit issues.
Step 2: Assemble the Diverter Into the Bucket
Most diverter styles mount inside the bucket at a slight forward angle, secured with screws or zip ties through drilled holes, then sealed around the edges with caulk to prevent leaks. Attach tubing from the diverter’s spout to your liquids container — a length of 3/8″ ID tubing with a simple screw fitting is standard and inexpensive. Make sure the liquids container sits low and stable enough that it won’t tip during normal movement, especially important in a van or boat.
Step 3: Prepare the Solids Side
Line the bucket (or the solids portion, if using a bucket-contained diverter) with a compostable bag, and add a base layer of your chosen carbon additive before first use. Keep a scoop and your carbon additive supply within easy reach of the toilet — a small bucket or bin next to the main unit works well — since convenience directly affects how consistently you’ll actually add material after each use.
Step 4: Add the Seat and Housing
A snap-on seat lid designed for 5-gallon buckets attaches directly with no additional building required — the simplest path to a usable toilet. If you want a more finished look, build a plywood box or bench around the bucket setup with a cutout for the seat, following the general enclosure principles covered in our composting toilet enclosure guide. Whichever route you choose, make sure the bucket itself can still be lifted straight out for emptying without needing to disassemble anything.
Step 5: Add Ventilation (Recommended, Not Required)
A basic vent kit — a small computer-style fan (commonly a 60x60x25mm size) plus tubing to route air outside — meaningfully improves odor control over a purely passive setup, following the same principles as our general venting and ventilation guide. This is the one upgrade worth prioritizing if your budget allows for anything beyond the bare essentials.
Emptying and Maintenance
Empty the liquids container every 1–2 days, similar to the budget manufactured tier covered elsewhere on this site. For solids, most builders report emptying weekly to every few uses depending on bucket size and household — tie off the compostable bag and transfer it to a dedicated outdoor compost pile or per your local regulations, covered in our legal requirements guide and fertilizer safety guide.
Cleaning Between Bucket Swaps
After emptying a bucket, rinse it with a diluted vinegar solution rather than bleach, following the same reasoning covered in our general maintenance guide — bleach can kill the beneficial aerobic bacteria you’re relying on elsewhere in the system, even though this particular bucket is now empty. Let it dry fully before returning it to rotation, since starting a fresh cycle in a still-damp bucket undermines the moisture control your carbon additive is otherwise providing.
Common Build Mistakes
- Skimping on the diverter and ending up with a poor seal that lets urine cross into solids — the single biggest cause of DIY odor complaints, same as with manufactured units
- Using fine sawdust instead of coarse, which compacts and traps moisture rather than absorbing it properly
- Building a housing so tight around the bucket that it can’t be lifted straight out for emptying
- Skipping ventilation entirely and relying only on a tight lid, which works less reliably than active airflow
Scaling Up for More Than One Person
A single 5-gallon bucket setup works fine for one person or occasional use, but two full-time users will fill it noticeably faster than the schedule described above. Rather than emptying more frequently than you’d like, consider building with a larger container if your space allows, or simply keeping more buckets in rotation — three or four rather than two or three — so you’re never caught needing to empty on short notice. The diverter and seat setup scales to a larger container without modification in most designs, since the core mechanism doesn’t change with bucket size.
Testing Your Build Before Relying On It
Before treating a freshly completed build as your primary toilet, run it through a few test uses to confirm the diverter is actually separating liquid and solid waste the way it’s supposed to, that tubing connections don’t leak, and that the seat and lid sit securely. This is a five-minute check that catches the most common first-build issues — a slightly misaligned diverter, a loose tubing fitting — while they’re still an easy fix, rather than discovering them after the unit is already fully in service and integrated into your daily routine.
Once you’re confident the build works reliably, pair it with our carbon additive comparison to settle on a medium and our general odor guide if anything comes up during your first few weeks of real use.
Related Guides
- How to build a DIY composting toilet
- DIY composting toilet plans — free vs. paid
- DIY urine diverter guide
Frequently Asked Questions
Do I need a lid gasket or seal on the bucket itself?
Not typically for the outer bucket if you’re using a snap-on seat lid, since the seat itself provides a reasonably tight closure between uses. The diverter’s internal seals matter more for odor control than the outer bucket lid.
How many buckets should I keep in rotation?
Two to three is typical — one in active use, at least one clean and ready to swap in, and ideally a third if you want buffer time before needing to deal with a filled bucket immediately.
Can I use a regular (non-snap-on) toilet seat instead?
Yes, if you’re building a full enclosure with a proper cutout rather than sitting the seat directly on the bucket rim — a standard toilet seat works fine mounted to a plywood surface, while a snap-on style is specifically designed to sit directly on the bucket itself.
Is this method sturdy enough for a full-size adult?
Yes, standard 5-gallon buckets are rated for substantial weight and are widely used this way, though check your specific bucket’s rated capacity if you have concerns, and ensure it’s sitting on a stable, level surface rather than an uneven one.
What’s the total build time for a first-timer, start to finish?
A bare bucket-and-diverter setup with a purchased diverter typically takes an hour or two of actual assembly time for a first attempt, not counting any shipping wait on parts. A built box or bench enclosure adds a half-day to a full weekend depending on your woodworking pace and experience.
Can this design work in a vehicle that moves regularly, or is it better suited to a stationary setup?
It works in a moving vehicle, but secure the bucket and liquids container against sliding or tipping during travel — a simple strap or a snug-fitting cubby built into your van’s layout does this well. A stationary setup has more flexibility in placement since motion isn’t a factor.
Is a bucket toilet noisy or awkward to use compared to a manufactured unit?
Day-to-day use feels essentially identical to any composting toilet — sit, use, add carbon additive. The main practical difference from a manufactured unit is the lack of an integrated agitator, meaning there’s no crank to turn, just a scoop of additive added by hand each time.