
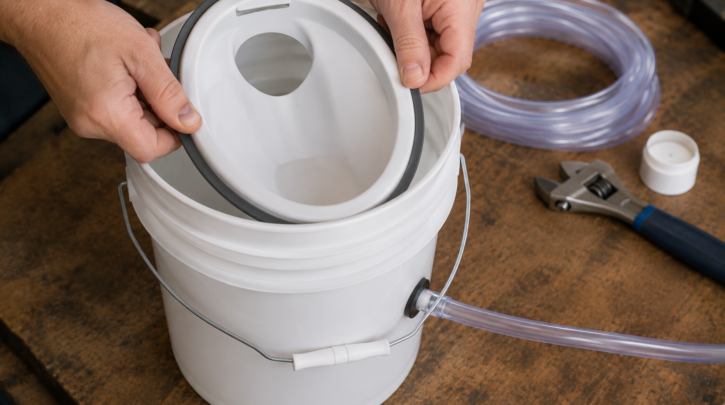

The urine diverter is the single most important component in any composting toilet, DIY or manufactured — it’s the one part responsible for the odor-prevention mechanism covered throughout this site. Here’s how to build one yourself, and when buying one instead is worth the money.
This guide covers both paths in real detail — the homemade build process step by step, and what you’re actually getting for your money if you buy one instead — so you can make an informed choice rather than defaulting to whichever option you happen to see mentioned first online.
Why the Diverter Matters This Much
As covered in our how composting toilets work guide, urine mixing into solids is the single most common cause of odor complaints across every composting toilet on the market, manufactured or DIY. The diverter is the entire mechanism preventing that from happening — everything else in the system (carbon additive, ventilation) is secondary support for a job the diverter does at the source. This is why it’s worth getting right even on an otherwise bare-bones budget build.
It’s worth understanding this hierarchy clearly before you start building: a great diverter with mediocre carbon additive and no ventilation will still outperform a poor diverter paired with premium coco coir and an active fan. Get the diverter right first, then layer the other improvements on top as budget and effort allow.
Building a Homemade Diverter
The classic DIY approach uses a second 5-gallon bucket as raw material:
- Take a second plastic bucket and cut off about an inch from the bottom — you only need this bottom section, so the rest can be discarded or saved for another project.
- Cut that bottom section in half from side to side, creating two semi-circular pieces.
- Join the two pieces together using a cotter pin and a rubber washer, creating a hinge-like connection.
- Attach the assembled diverter to your main bucket at a slight forward angle, using drilled holes and zip ties or screws.
- Seal any gaps around the mounting points with caulk to prevent leaks.
- Attach tubing (typically 3/8″ ID) from the diverter’s low point to a liquids container positioned below and in front of the main bucket.
Total material cost for this approach is minimal — often just the price of a second bucket and a few feet of tubing, assuming you already have basic hardware on hand. The tradeoff is that getting the angle and fit right takes some trial and error; expect to make small adjustments after your first few uses rather than getting it perfect on the first attempt.
Buying a Diverter Instead
Purchased diverters, typically sold in the $25–$100 range, come in a few standard styles worth knowing about before you buy. Most are sold by small specialty sellers on platforms like Etsy and eBay rather than major retailers, since this is a genuinely niche product category — search directly for “composting toilet urine diverter” rather than expecting to find one at a general hardware store.
- Snap-on models — designed to work with a standard snap-on bucket lid, the simplest style to integrate into a bare bucket setup.
- Bucket-contained models — sit inside the main bucket alongside the solids, sharing the same container rather than requiring separate mounting.
- Mounted models — designed to be built into a custom plywood enclosure rather than sitting directly on a bucket, giving more flexibility for a finished-looking build.
- XL models — a larger-capacity version for higher-use situations, sometimes bundled with a ventilation attachment for an additional cost.
A purchased diverter’s main advantage is a proven, tested shape that reliably separates liquid and solid waste from the first use, without the fitting adjustments a homemade version typically needs. If this is your first DIY composting toilet build, this is genuinely the one place we’d recommend spending a bit more rather than trying to save every possible dollar.
Which Style Fits Your Build
Your choice of diverter style should follow from your overall build plan rather than the other way around. If you’re going with a bare bucket and snap-on seat, a snap-on or bucket-contained diverter matches that setup directly without requiring any additional enclosure work. If you’re building a plywood box or bench enclosure, a mounted diverter integrates more cleanly into that kind of custom build, since it’s designed to be installed into a surface rather than sitting directly on a bucket rim. Decide your overall build approach first, then choose the diverter style that matches it, rather than buying a diverter and working backward to figure out how to build around it.
Installing a Purchased Diverter
Most purchased diverters ship with their own basic installation instructions specific to that model, but the general process mirrors the homemade approach: mount at the recommended angle, seal any gaps with caulk, and connect tubing to a stable liquids container. Test with water before first real use to confirm the seal holds and liquid actually routes to the intended container rather than pooling or leaking, the same testing step covered in our 5-gallon bucket build guide.
Give yourself more time for this step than you might expect — even a purchased diverter with a proven design benefits from a careful, unhurried install rather than a rushed one. A loose fitting or an under-sealed gap is far easier to catch and fix during initial installation than after the unit is already in daily use and you’re trying to diagnose an intermittent odor issue weeks later.
Troubleshooting a Poorly Fitting Diverter
If you’re getting urine crossover into the solids side after installation, check the mounting angle first — a diverter sitting too flat rather than sloped forward is the most common cause. Next, check for gaps around the mounting points that caulk didn’t fully seal, and confirm the tubing to your liquids container isn’t kinked or blocked, which can cause backup and overflow into the solids side. Most fit issues are resolved with a small angle adjustment rather than requiring a full rebuild.
Seating Position and Diverter Performance
Even a well-built diverter depends partly on correct seating position to work as intended, the same principle covered for manufactured units throughout this site. Most diverters are positioned to catch liquid toward the front of the seat, meaning sitting further forward than habit might suggest on a standard flush toilet improves diversion reliability regardless of how well the physical diverter itself is built. If you’re getting occasional crossover despite a properly mounted diverter, this is worth checking before assuming a hardware problem — it’s frequently a positioning habit rather than a build defect.
This matters especially for guests or family members using the toilet for the first time — a quick explanation of proper seating before their first use prevents the majority of crossover complaints that would otherwise get blamed on the diverter build itself, when the actual cause is simply an unfamiliar user sitting the way they would on a standard flush toilet.
Related Guides
- 5-gallon bucket composting toilet guide
- Cheapest way to start a composting toilet
- Composting toilet smell & odor guide
Frequently Asked Questions
Can I use any bucket brand for a homemade diverter, or do they need to match?
Using an identical bucket to your main container generally gives the cleanest fit, since the diameters match exactly, but a close approximation works fine with minor adjustment — the fit doesn’t need to be exact, just reasonably close.
How do I know if my diverter is working correctly?
Check the solids side periodically for signs of excess moisture — if it stays reasonably dry between uses and your liquids container is capturing urine as expected, it’s working. Persistent dampness in the solids side despite adequate carbon additive is the clearest sign of a diversion problem.
Do purchased diverters work with any bucket size, or only 5-gallon?
Most are specifically designed around standard 5-gallon bucket dimensions, since that’s the overwhelmingly common size for this kind of DIY build. Check the specific product listing if you’re using a non-standard container size.
Is it worth building a second homemade diverter as a spare?
Given how inexpensive the materials are, yes — keeping a spare on hand means a cracked or damaged diverter doesn’t take your toilet out of service while you source replacement parts, particularly useful if you’re relying on this as your only bathroom option.
How long does a homemade diverter typically last before needing replacement?
Plastic bucket material is fairly durable, and most homemade diverters last as long as the bucket itself does — often a year or more of regular use — though the pin-and-washer joint is the most likely wear point and worth checking periodically for looseness.
Is a purchased diverter easy to move to a new build if I upgrade my enclosure later?
Generally yes — most purchased diverters mount with screws or zip ties rather than permanent adhesive, so transferring one to a new or improved enclosure is usually straightforward, provided the new setup accommodates the same general mounting approach.